Prerequisites :
You need an internet connection. Both HTTPS ports must be accessible. it is up to you, to give the plugin access to the internet. DEM Earth can not do anything without an internet connection.
Your username will usually be sent you you, when your account is created. (see notes)
You should use your order ref number as the password. (see notes)
- DEM Earth will lock to your node ID when you first use it. This is automatic. You do not need to send us any information beyond what you provided with your order.
- It is a good idea to Join our Discord Channel.., where you can get info about updates, and talk with other users.
- Keep your eye on the Change log... Newer versions may be available(visit Discord), and recent builds will inform you of updates.
All versions
- Firstly, extract the DEM Earth zip file to any location on a local drive.
- Plugins can be stored anywhere, on a local drive and no longer need to be in the traditional plugins folder.
- You should stop using the old plugin folder(s), as in previous versions. Use a single folder, which you can keep organized, and access from multiple versions of Cinema 4D.
- Do not use prefs/plugins !
- Do not use the Application Plugins folder.
- Once you have exacted the plugin somewhere, and open the C4D Preferences dialog, and point a search path at your new plugin folder.
- You need to set up a plugin path from prefs/plugins pointing to where you have extracted the DEM Earth zip file.
 Once you have set up the plugin path, restart Cinema4D.
- You should see an entry prefs for "CinemaPlugins.com". Open that entry, to reveal the DEM Earth plugin prefs.

Click on DEM Earth - prefs and the prefs will open.
DEM Earth Prefs

- Download latest Build: if your support is up to date, you can download the latest build via this button.
- Version : The version of DEM Earth you are currently using, and have installed.
- Renew your support : A convenient link to purchase support renewal.
- Service : The number of service days you have remaining.
- Upgrade To Floating : A convenient link to upgrade your license to floating.
- Add/Remove Node ID : If you have a floating license, you can remove your node ID, or and/or add new one.
- Node ID : This is your current node lock. An Identifier for your hard and software version.
- Add Additional Seats : A convenient link to purchase additional seats (requires a floating license).
- Registered ID(s): This is the ID that your license is currently locked to (empty if you cleared it, or not yet registered). if you have multiple seats you can have multiple ID's stored here.
- Load Account from File : if you previously saved you account info to a file, this button lets you load it from that saved file. This files contains your account info, so you can not forget it, or get it wrong.
Important : if Node ID does not match one of your Account Node Lock ID(s), your license will not work.
Account Info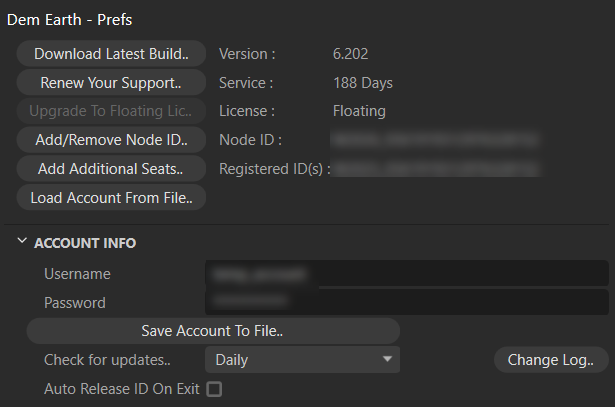
Setup up your DEM Earth account from here : https://cinemaplugins.com/demearth/create-your-dem-earth-account/
Once that is done, you can proceed and enter you account info in to DEM Earth prefs.
- Username : Enter your account name here.
- Password : Enter your password (usually your order ref number).
- Save Account (info) to File : Stores your account info in a file so that you do ot forget it, or get it wrong in the future. Keep the info somewhere safe, and make a backup of it, etc.
- Check For Updates:
- Auto Release ID on Exit : If you have a floating license, this option lets you release your current node ID when you exit C4D, releasing your license. If this option is enabled, it will reconnect your current ID the next time you use the plugin. You must have a free license/seat to be able to auto add your ID, and active support
File Caches
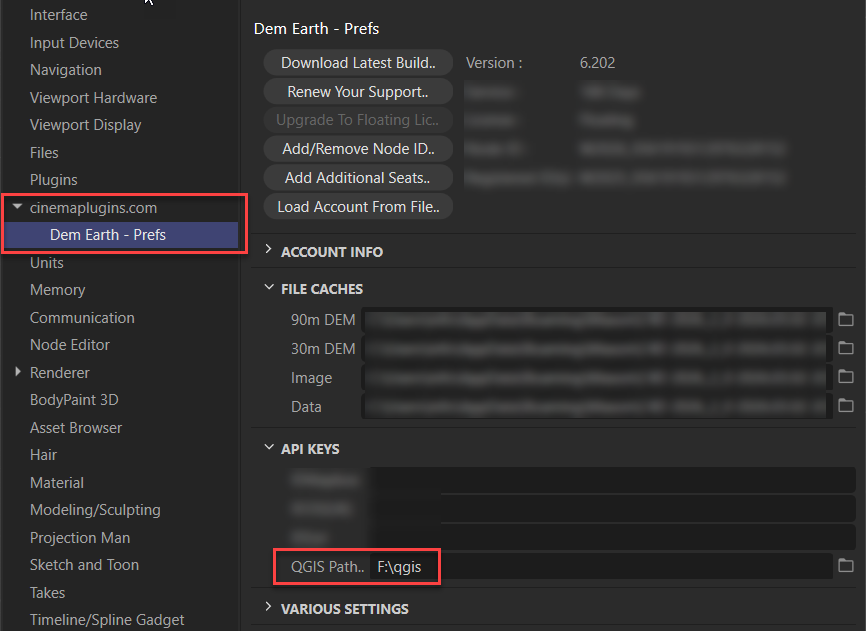
File Caches : Various cache locations. These are set up Automatically on first use, but you might want to change them to some other location, so that you can share your cached data between multiple version cinema4d. Best is to use the fastest drive you have, with lots of space.
QGIS folder : In R6 or greater, you can set a path to your local QGIS install. This is currently used to reproject GeoTiff's.
If you set this path, when you add a Geotiff height data layer to the data manager, it will ask if you want to created a reprojected copy of the geotiff, and automatically run GDal Warp for you.
Warp can take a while , but when it is finished, it will automatically load the reprojected version for you.
Various Settings
Texture downloader

- Warn if are above: will warn you if when you start downloading more tiles than this number.
- Max Thread Count : Limit the number of concurrent download threads to this number. Reduce this if you have problems.
- Resulting Image format : Tiff, png, or EXR. This is the format of images generated by the image compiler. Select the one that works best for you. tiff is generally the fastest, but is larger on disc.
- Resulting Image preview size : The preview size of the final compiled image. Reduce this to improve display performance with large images.
- Make Gradients on new objects : if you don't want the default gradient, turn this off.
- Texture tags are adaptive : if set to true, newly built texture tags will be set to be additive.
- Default HDR : the location of a HDR to load for a Redshift dome light background.
- Map Loader : Lat Split : the distance in Latitudinal degrees to split downloaded images by. For large areas , lower value will produce more image blocks. If you don't want any splitting, set this higher. Splitting rectifys latitude distortion on big areas. In 5.615 and beyond, you can easily bake split images into one image.
- Baking Depth : The bit depth used for baking imager or normals from the Image loader.
Other Stuff

- Gpx ele tag behavior : This defines the behavior of the ele tag, of a gpx file. Useful if you want to capture elevation above ground level, when importing gpx (i.e. flight paths)
- Make gradients on new objects : if you don't want a gradient material on new dem earth objects, turn this off.
Todo:
Move Flush memory to data manage)
Move Center After embed to data manager
Custom Image Layer

- Layer Name : A name you want to give to your custom layer
- Tile Method : OSM, Esri,Esri2,Bing, or Google tile name convention.
- Tile suffix : png, jpg or jpeg.
- URL : The url to your custom tile layer.
- API Key : if your layer requires an api, you need to put it here, including its variable name (see your tile url)